background

Saturday, August 27, 2011

How to Get the Perfect Dew Drop Swirl


Ever since I received my Robin's Nest Dew Drops I have been wanting to try the rhinestone tool on my SCAL2 with the Dew Drops! So, this week I got out my Dew Drops and more items from the Robin's Nest to make a beautiful page for my niece's up coming wedding.


Most digital cutter software programs have a rhinestone tool. SCAL2 & 3, Pazzles software, Make the Cut and more. I can tell you that the Cricut DS and the Cricut Gypsy do NOT have a rhinestone tool. So, look for some options at the bottom of this post for those of you who don't have a cutter with the rhinestone feature!


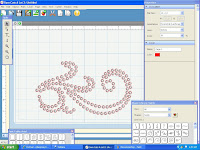
I opened my SCAL2 and using the swirl shape library, chose a swirl I liked and sized it the way I wanted. I then selected the rhinestone option, under the Object menu. Once inside the Rhinestone dialog box, I selected the shape of the rhinestone as round and set my rhinestone size SMALLER than The Robin's Nest Dew Drops I was using.


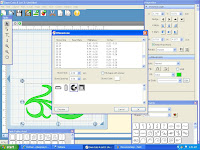
I then loaded my Cricut with the pen tool and a red pen to match the color of the Dew Drops. I then loaded The Robin's Nest patterned paper onto my mat, and hit the cut. Below you can see a picture of the circles drawn on the paper.


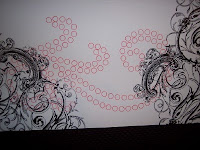
You can also cut holes in a scrap piece of paper BIGGER than the Dew Drops and used this as a template. I just prefer the pen method for gluing!


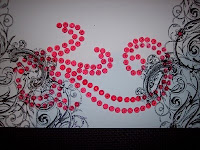
Once I had my circles drawn, I used my Quickutz tool to lift The Robin's Nest Dew Dew Glue off of the sheet and adhere them to the center of the drawn circle. Don't have that tool? You can use an awl, or the Creative Memories tool. Don't try and pick up the Dew Dew glue with your fingers as they will loose their stickiness! I then added The Robin's Nest Dew Drops in Red.


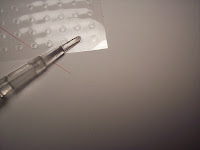
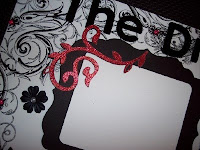
The black frame and red glitter swirls are both cut from the Cindy Loo Cricut Cartridge (see photo below). I cut The Robin's Nest Red Glittered Chipboard with my Cricut, using the Deep cut housing blade and a multi cut of 2 for the swirl. Love how wonderful this cuts! See below for a complete list of supplies.


For those of you who do not have a cutter and software for placing rhinestones on a swirl use this method: Place a chipboard swirl on top of your page where you want your dew drops. Lightly trace the swirl with a colored pencil to match the color of the dew drops you choose. Using a flexible tape measure, mark off along the swirl where you want the center of your dew drops to be in an even increments. Now erase the line between the marks for the center of your dew drops, then glue. Try starting the dew drop placement at the tip of the swirl and working back to the base for a more natural look!


And for those of you who have a Cricut Gypsy or Cricut DS software, please see this post for how to get even placements.


Supply List


The Robin's Nest Dew Dew Glue


Anna Griffin Peyton Collection Chipboard Letters


The Robin's Nest


Bazzill Flowers


Black Cardstock


Cricut Cindy Loo Cartridge


Sunday, August 21, 2011

Fabulous Felt Challenge at Moxie Fab!


Sometimes, the Moxie Fab Challenge is just too tempting not to try! The latest challenge is called Fabulous Felt. I got out a favorite stamp by Inkadinkadoo called Wellspring and my CTMH White Pigment Ink and then fussy cut around it. I added stitching and another CTMH stamp set for the sentiment and the sympathy card is done.

Thanks Moxie for a fabulous challenge and for teaching me that simple can be fabulous!

Wednesday, August 17, 2011

Girly & Gutsy Tuesday Trigger at Moxie Fab


This weeks Tuesday Trigger at Moxie Fab is Fabulous! They're calling it Girly and Gutsy. When I saw the photo, my eye was drawn to that chandelier! It made me think of the Spark Burst Brads from Karen Foster Designs, one of my favorite embellishments. And, it reminded me that on my to do list is a little project of making a look for less of that same embellishment. So, I got out my pins and The Robin's Nest Dew Drops and tried my hand at a look for less for this weeks Tuesday Trigger (photo below).


To make my chandelier, I glued The Robin's Nest Dew Drop in the center of 4 white flat headed pins. I punched a white circle and glued it onto 4 yellow flat headed pins, and then blued more dew drops on top. Then I just created spokes with two pins each, heads at opposite ends. There is also a dew drop in the center.


I also wanted to share this idea I had for getting the perfect circle with your clear acrylic circle stamps. This stamp set is called Free Spirit, by Close to My Heart. It has been well loved and I have struggled in the past to get it lined up on my acrylic blog to make the perfect circle. So, today it occurred to me, to use my Creative Memories Circle cutting tool to get it perfect on my block. See my photo below. Try it!


The black felt letters are Anna Griffin Peyton Collection, and I cut the black circle with my George Basic Shapes Cricut Cartridge.

Monday, August 15, 2011

Crafty Sprouts Tent Card Challenge


I have had this idea in my crafty mind for quite some time, but just had no time to make this card. I saw that Crafty Sprouts is having a drawing for a Scrap'n Easel and if you enter the their tent card challenge, you will be entered. So, here is my chance to try this idea and neglect the housework!


I have the Heartfelt Creations Decorative Window Scene die and have been wanted to make a little flower box for it! So, here is my card! To get the flower box, I traced the bottom outside of the die and cut it by hand. I then cut and scored a rectangle to fit behind it and become the box with sides about 1/4". I used another Heartfelt Creation stamp set and die (Posy Patch flowers PreCut Set and Posy Patch Die) for the yellow flowers and filled the center with Black Gala Glitz. The roses are My Favorite Things Mini Rolled Rose, the pink flowers are a McGill punch and I just rolled the edges a bit. The center of the pink flower is The Robin's Nest Dew Drop.


I also used the Cricut Birthday Cake Cartridge for the vine and the stems for the yellow flowers and hand cut the pink flower stems. Below is a close up of the flower box.


To add more body to the card with the cut out, I once again used some plastic packaging for the clear window. Love to be crafty and green!

Saturday, August 13, 2011

Great Looks for Less with The Robin's Nest!


I pulled out my salad packaging again today and made two great looks for less with The Robin's Nest Dew Drops and Rub ons! I started with a flower using the Tim Holtz Tattered Florals (see photos above for flower). I cut two of the larger flower and one of the medium size flowers all from the lid from my salad packaging (see photos for pieces before assembly)!


I used Tim Holtz alcohol ink Raspberry on the edges and Dew Drops from The Robin's Nest Summer (center) and Fr Mowed Grass(outer circle in center of flower). I love this look and it is so inexpensive it can be used for cards too! Be sure to gently fold the edges of the petals and the petals before you add your alcohol inks!
Now, I used The Robin's Nest Dragonfly rub ons on the same packaging and cut around it with my scissors. I bent up the wings and then used a dries clear glue (very lightly) on the dragon fly wings and some Art Glitter Ultrafine Transparent Spring Creek glitter on the wings. Be sure to bend first so you don't knock off the glitter and use a transparent glitter to allow your rubon to show through. I love how this iridescent look on dragonflies, just like Mother Nature!
I used the Robin's Nest Glitter Chipboard in pink for more flowers, again cut with Tim Holtz Tattered Florals die. The edges were distressed with purple ink. Also used are The Robin's Princess Chipboard (castle) and Priness Word (Pricess in Training title), the journaling block is The Robin's Nest and actually from a boy product! The background paper is The Robin's Nest Fleur Tropicana. I think I just may use every color of this Fleur this year, I love it so much!


I sprinkled more The Robin's Nest Dew drops in the center of paper Prima Flowers. What a great way to glam up these paper posies! A few buttons and tiny dragonfly rubons added and the page is finished.


Supply List


The Robin's Nest Dew Drops in Summer, Fr Mowed Grass, and Lovebirds


Art Glitter 207 Spring Creek Ultrafine Transparent Glitter


Tim Holtz Tattered Forals die


Wednesday, August 10, 2011

And the Winner Is...


And the winner of the $10.00 gift certificate with free shipping is...#11: Samantha! She said, "TFS, Your covers are great:-) Neat idea for a blog hop:-) Sam. Sam, please look for an email from me today with details on how to claim your prize!


For those of you who loved my items, but waited to see if you've won, you can still use the %30 off coupon through this Sunday, August 14th! Thanks for participating!

Sunday, August 7, 2011

Scrappers Summer Sale @ Etsy Blog Hop

Welcome to the Scappers Summer Sale at Etsy Blog Hop! A group of Etsy Stores that sell scrap booking supplies, tools and scrap room accessories, have joined together to offer you a great summer sale at each of their stores. Each store is holding a SALE and sponsoring a blog hop stop. There are prizes along the way, so be sure to stop at each blog and get the details on the sales and give aways! Here is a list of all the participating blogs (in no particular order):


Cricut Crafty Clare (you are here)


To celebrate the blog hop, I am sharing a card I made with my Cricut Imagine (above) and the Audrey cartridge. It was inspired by another Etsy shop, whose link I have since lost. She makes jewelry with ribbons and beads, and I thought this look would be great for a card. So, I used my Tim Holtz Rosette die and put the beads in the valleys of the rosette. The Congrats is SRM stickers, I added some bridal button trim I inked in yellow, a button and a bow in crochet thread. I don't get to use my Imagine as much as I would like, so I keep it covered to keep the dust off the machine and my mats. All of my covers would add instant style to your crafting space and keep them dust free! You can find one just like the one below at my Etsy store and it's all on SALE! Everything is 30% off! Just use the coupon code HOTSALE, when you check out.


A little intro for me and my shops: I have two stores on Etsy: Scrapguild and Scrapincovers. Both carry dust covers for all types of digital covers which I design and make myself. Below you can see a Cricut Expression cover. I have a fashion design background and make my own patterns. Most of my orders are custom, so if you don't see a color, fabric or the machine cover you want, just drop me a note via the convo on Etsy or via my email link here. You can check my sold items for photos of dust covers for cutters such as Silhouette and Pazzles. I don't keep them in stock as demand is lower for these machines. I love custom orders! I also make scrap bags for the paper crafter or general crafter and these are my most popular item at crops! You can see more about my scrap bag and it's great features in this video on Youtube. I carry a few other embellishments and scrapping pieces as I make or find them along my creative journey.


Now, how about a giveaway?! I am offering a $10.00 gift certificate to be used at either Etsy store: Scrapguild.etsy.com or Scrapincovers.etsy.com. To be entered to win, visit my stores and find your favorite item. Leave a comment on this post by 12:00pm, August 9, 2011 and I will draw a winner on Wednesday morning August 10, 2011. Please leave a way to contact you in your post in a safe manner! For example typing at instead of "@" and dot instead of "." will help prevent spam from other sites! Also, I will offer free shipping for any item purchased with gift certificate. You don't need to follow my blog to win, just comment on something you see in the shops you like with a contact email addy! Your next stop on the hop is Creations by Christie!

LinkWithin

Related Posts with Thumbnails