background

Friday, June 25, 2010

Lace Border Inspired by Basic Grey


I saw the new lace die cuts available from Basic Grey and love them. This one looks very much like the double wedding ring quilt block and I thought it would be easy to make a cut file. So, here it is in the Gypsy format. It will require George, and was created in a size for a 12 x 12 page, but you can scale it down for cards too!
Please leave a comment if you download and encourage me to share more. I feel as if I am having a "Stop the World, I want to get off and scrapbook," kind of summer. On the flip side, my boys are busy and staying out of trouble! It's all about minimizing screen time!

Wednesday, June 16, 2010

More Basic Grey for an Expression Cover


Just finished a custom order for a repeat customer. Love it when a customer likes my work enough to order more! I usually struggle to find fabric when this happens as my fabric vendor moves merchandise quickly. Don't you just love Basic Grey?!
Not much time for posting lately as I am getting ready for Vacation Bible School crafts! 80 students for 5 days. I have ideas for 4 of the five days. Still looking for ideas for one day. Theme is God's word is transforming and weekly theme is High Seas. I am considering an Origami frog, as a tadpole transforms into a frog. Seems as if summer has been busier than the school year!

Wednesday, June 9, 2010

Etsy Blogger's Blog Carnival: Goals


I have been planning to post about a large quilt I have been working on and just haven't found the time. The Etsy bloggers have asked us to talk about our goals and accomplishments in this weeks carnival. So, here's my chance!
My accomplishment on this project is that I am done cutting and my short term goal is to finish sewing my light to dark squares for the quilt pattern pictured above. Below you will see some cut pieces. Love the colors and the tie like patterns!
It is called Buggy Wheels and the pattern is from the Buggy Barn. I love the Buggy Barns designers sense of color. It looks so masculine, yet warm. I actually bought this kit awhile ago, but got discouraged while cutting it. I am making it for my youngest first big boy bed. He just got his new bed last week, so I must re-engerize myself. So, I hope to finish the light to dark squares by this Saturday.

Next short term goal: sew the dark to dark squares together. I hope to have 320 of those sewn together by next Friday.
Then to begin piecing my blocks. Not sure how long to give myself on this. Add the stips, and sew the rows.
My long term goal, to finish the top of the quilt and send it to my sister Marge to long arm quilt it for us. I am going to hope my portion will be done by the end of June. Will keep you posted on my progress.

June's Featured Etsy Blogger: BeadedTail


It's time for Etsy Blogger's featured June blogger: Beaded Tail.blogspot. If you are an animal and bead lover, you may just want to check out this blog and shop: BeadedTail.

Etsy Inspired Challenge #91: A YourStory Cover


When I saw this weeks shop for the Etsy Inspired Blog, I knew immediately what I wanted to make. The shop is called Howbeadyful and she makes the most wonderful fabric covered buttons. It was hard to pick just one for inspiration, so I may have to consider entering more than once this week! Here is my inspiration item: a bottle of blue buttons.
I love all things dark blue! You know, cobalt, midnight, navy, the darker the better. I created a pattern for the YourStory awhile ago, but life is busy and I had not gotten around to sewing a first sample. So, this challenge was my excuse to get sewing. I think I started sewing dust covers, in part to use my wonderful collection of buttons. I have so many wonderful shank buttons that are just to bulky to fit on the page, and I am afraid to cut the shank off some of my vintage one. So, here is my entry in the challenge, a dust cover for the YourStory machine, and yes, it is available at my Etsy store: www.scrapincovers.etsy.com.

Monday, June 7, 2010

SVG Backpack Instructions

Here are the instructions for making the backpack using the svg file. If you wish to make the larger bag, you will need to import your svg into SCAL and scale it up. Highlight your shape, and make sure you lock the proportion so that the bag changes in the X and Y direction in the same proportion. Scale all the pieces and check the measurements of the flaps against the sides of the bag.
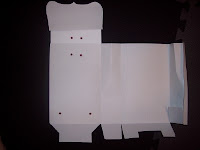
Cutting the bag1) Cut the backpack base and pocket flap (this will be with the largest paper) with the right side of the paper towards the stick side of the matt. DO NOT unload your matt and swap out your blade for a cricut marker.
2) Leave your backpack base piece in place on the matt, and your paper loaded in the machine. Open the eyelet marking svg and scale it if necessary to fit the larger bag size. Then "cut" with the marker.
3) Swap back to the standard blade and cut the pocket and bag flap pieces
4) Cut the contrast flap pieces


Preparing Bag for assembly1) Score back pack base with lines perpendicular to the straight top edge and running through the lowest valleys of the bottom of the bag (uneven side)
2) Score the back pack with lines from one side of the back pack to the other, running in a straight line through all of the lowest portion of the valley on the bottom of the bag piece.
3) Score the back pack top piece where the marquee shape ends from edge to edge
4) Score the back pack top piece 1 1/4" from where the marquee shape ends for the bigger bag and 1" for the smaller bag
5) Glue the scored back pack flap to the back of the back pack base lining up the scored line closest to the straight edge with the top back of the bag.
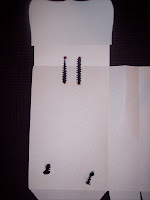
6) Use your anywhere punch to punch holes as marked with the Cricut markers above. You should be punching 4 holes.
7) Hand mark dots in the middle of the folded top of the back pack flap parallel to the dots marked with the Cricut
8) Use your anywhere punch to punch these hand marked dots
9) Set eyelets in the six holes just created.
10) Fold your back pack at the sides, matching the front and back pieces with right sides together and excess towards center of the bag. Crease along center about 3 inches down, but NOT all the way to the bottom (see photo above).

Adding Ribbon
1) Tie a double knot at the end of the ribbon.
2) Starting at the bottom eyelet on the inside of the bag, thread ribbon through the eyelet to the outside of the bag. Pull ribbon through until stopped by the knot.
2) Thread the ribbon through the top back pack hole from outside to inside
3) Thread the ribbon through the flap eyelet just above the eyelet just threaded, from inside to outside
4) Thread the ribbon through the flap eyelet next to the eyelet in the flap just threaded
5) Follow the eyelets down the opposite side of the backpack as on the first side and finish the ribbon with a double knot on the inside.
6) Adjust ribbon evenly and glue dot on the inside between the top eyelets and back pack top eyelets, so hanging loop does not slip.
Use terrifically tacky tape to glue together the bag. Start with the sides, then the bottom side flaps, gluing the center bottom portion last. Oh, this was wordy! Hope you find this as simple and as cute as I did!

Sunday, June 6, 2010

Grad Gift: Back Pack Treat Box Converted to SVG


I just finished converting my favorite cut file to SVG format and had to share. Isn't it adorable?! I got the original cut file from Nancy on the Cricut MB and you can find her blog here. The original cut file was made with George and Accent Essentials and fit on a 12 x 12 page and required some hand cutting on the flaps. I wanted a version to make on the 12 x 24 page, wanted to eliminate the hand cutting and add a cut file for marking my eyelets with markers. So, while I have the Gypsy, the SVG was the way to go to get all of the above.
Also, I made this file in the 12 x 12 size, but you can scale it up as I did to cut it. You may also find the construction confusing, so I will be covering the how to's in my next post. I plan to use my backpack for my nieces graduation gift. She is graduating from High school and going to college next fall. So, I will include a gift card, some hand made cards (for her to send to friends and family), some coupons for the local pizza stores at her new college, and a few small goodies for dorm life (stamps,roll of quarters, etc.). The finished bag pictured above measures 9" high, 5 3/4" wide and 2 1/4" deep.
Here is the backpack base and pocket flap.
Here is the backpack pocket and flap.
Here are the flap contrast pieces (underside).
Here is the eyelet marking file.
Here is your supply list:
1 Sheet 12" x 24" paper (I used the artist paper at Michaels and cut it down)
1 12 x 12 sheet patterned paper (I used Basic Grey Urban Prairie Meadow)
1 12 x 12 Sheet black card stock (I used Basic Grey Urban Prairie Black)
Pink card stock (used with SVG Cuts 3 D flower cut file to make my flower embellishments)
2 Buttons
1 roll Terrifically Tacky Tape by Provo Craft
2 Velcro or hook and loop sticky dots (go under flaps)
1 Yd ribbon
glue dots
6 large eyelets
Would love some comments from my svg friends! Also, this summers dust cover sales will go towards my sons violin lessons. If you know someone who would like a dust cover, please share my blog and store addresses! Thanks!

Saturday, June 5, 2010

Summer Reading Strategies for My Fellow Moms

If you have school age children, you probably have some summer strategies to help you during the summer. Some of you may be just starting your first summer school vacation and may want to hear a few strategies to help you keep their school skills up and boredom at bay. Below are some of mine for keeping up reading skills.
*Sign up for summer reading programs at the local library. Our library has prizes at different minute levels, activities and entertainment.
*Don't forget the audio books! My kids love these at bedtime, rainy days, car trips, and I love them, when the kids just need to settle down.
*Use Amazon for recommendations. Type in the name of books you know your child likes and you will get the "people who bought this, also liked..." recommendations. My 10 year old has exhusted much of the books in my local library, so this is a great tool for us!
*Ask your librarian for recommendations too! They know what's hot.
*Use your schools online resources. My school district subscribes to Tumblebooks. This is great if you just haven't had the time to get to the library and for the new readers!
*Look into online games that are free and have reading opportunities. My kids like Club Penguin. They have a newspaper published on Thursdays that details all the site happenings and my kids love to read it.
*Check into your local bookstore for summer programs. My Borders has a rewards program, and if my child reads so many books, he can earn a free one.
*Sign up for any rewards program during the school year and be sure to remind your kids when you use the free tickets over the summer. This year we have free tickets to the local water park and Great America!
Do you have a summer reading strategy? Please share it in the comments.

LinkWithin

Related Posts with Thumbnails